


Earlier this week, we wrote about why teams from DevOps to Platform Engineering benefit from Resourcely Blueprints. In short, Blueprints are an on-rails experience for developers to deploy infrastructure that give cloud teams control over how that infrastructure is being configured.
Today, we’re going to walk through a specific example through the lens of an individual on a platform team named Rick.
This is a true story. The events depicted in this film took place in San Jose in 2023. At the request of the survivors, the names have been changed. Out of respect for the innocent, the rest has been told exactly as it occurred
Platform team at Hammocks, Inc.
Rick is on a platform team of 6 at a company called Hammocks, Inc. This company is the largest vertically integrated hammock maker in the US. The platform engineers support over 150 developers that are working on everything from internal tools (like a CRM, analytics, data, inventory, manufacturing, quality) to customer-facing applications (website, ordering, customer loyalty program, etc.).
Rick has 10 years of experience where he held mainly DevOps roles, and is well versed in everything it takes to deploy software applications. He has a broad skillset across infrastructure-as-code, CI, and GitOps, and is particularly well-versed in the AWS stack.
Challenge: Building a new AI-powered application
Last year, as the AI craze swept the nation, the CTO of Hammocks, Inc. committed to building a new AI-powered recommendation engine for their website that users could converse with in natural language. The company hired a new team that had experience building LLMs, but who weren’t familiar with deploying them on the AWS stack.
They needed a repeatable way to quickly configure and deploy infrastructure for LLMs, without breaking the bank. Rick met with the AI team and determined their requirements. They agreed that they team wants:
- the ability to self-serve deploy EC2 instances
- to only allow deploying GPU instances (EC2 types starting with
pandg) - a UI/form experience for deploying infrastructure
- to collect basic information about the model being deployed: which open-source models are being used, and what is the context window?
- to minimize the networking configuration the team cares about
- to be able to choose the attached storage size and type, with a default of
io2 - defaults for as many fields as possible
With these requirement in hand, Rick knew he needed to build a Resourcely Blueprint.
Solution: Resourcely Blueprint
Blueprints are tools that help developers deploy infrastructure without spending excess time working with Terraform or potentially misconfiguring cloud resources.
A Blueprint is a template built in Resourcely, that is automatically translated into a form that users can interact with. Blueprints allow you to define what options are available for the parameters of your resources, collection appropriate information, and give users a guided experience to filling out the Blueprint form (called a PR). Once a PR has been created and the appropriate options filled out, properly configured Terraform is generated and can be submitted to change management.
What end users interact with
In the end, Rick built a Blueprint that provided the AI team with a form that looked like this:
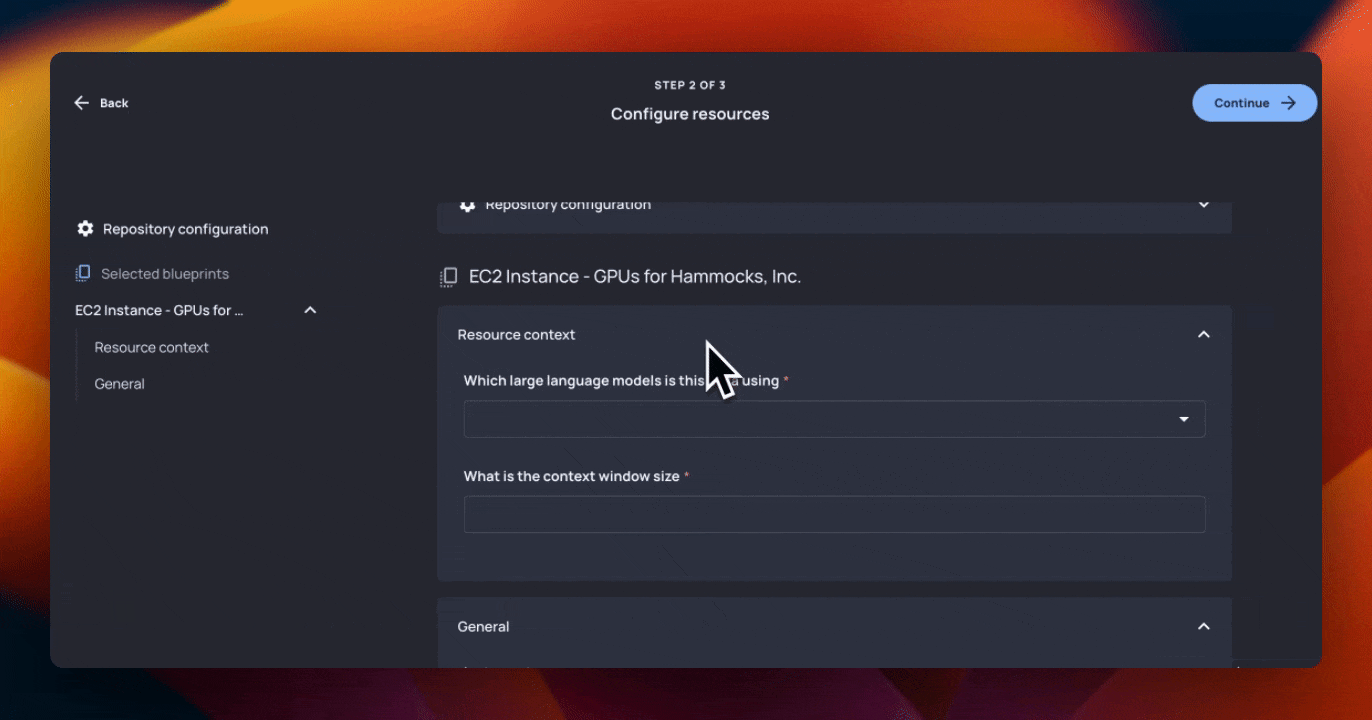
This form collects:
- Context information about the models being deployed
- Instance type (restricted to
pandgtype EC2 instances) - EBS Block information
- Name
- Size
- Type
- A user’s public key
- A list of IP addresses allowed to ingress into the EC2 instance
- Name of the resource
Terraform generated
Once the user fills the form out, properly configured Terraform is generated.
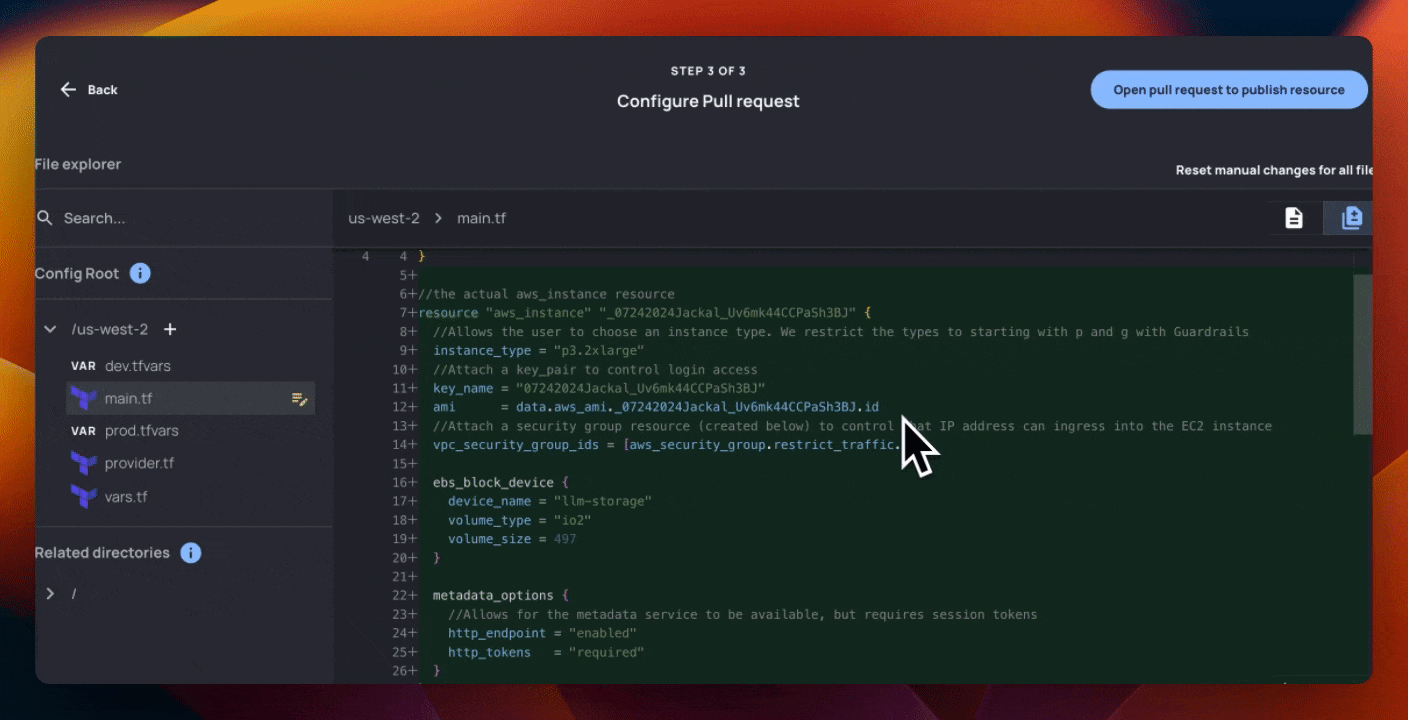
You’ll notice that this Terraform generated has substantially more information than the fields that the AI team wanted control over. The below Terraform creates 3 AWS resources:
- An
aws_instancewith an attached EBS block and linkedaws_key_pair - The
aws_key_pairitself - An
aws_security_groupwith ingress and egress rules
These resources all have opinionated parameters set that Hammock’s AI team doesn’t care about - but Rick’s team definitely does.
- Requiring tokens to use the EC2 metadata service
- Using an Ubuntu-based image
- Restricting traffic to the VM from a particular set of IP addresses
Building Hammock’s AI team Blueprint
Here’s the full Blueprint code:
---
constants:
  __name: "{{ name }}_{{ __guid }}"
variables:
  name:
    desc: "Name of the resource. We recommend using the date and model name, as in MMDDYYYY-Model_Name."
    default: "MMDDYYYY-Model_Name"
---

data "aws_ami" "{{ __name }}" {
  most_recent = true

//sets VM to an Ubuntu OS
  filter {
    name   = "name"
    values = ["ubuntu/images/hvm-ssd/ubuntu-focal-20.04-amd64-server-*"]
  }

//Uses a hardware virtual machine (hvm)
  filter {
    name   = "virtualization-type"
    values = ["hvm"]
  }

//limits to Hammock, Inc's AWS account ID
  owners = ["897965656"]
}

//the actual aws_instance resource
resource "aws_instance" "{{ __name }}" {
  //Allows the user to choose an instance type. We restrict the types to starting with p and g with Guardrails
  instance_type = "{{ instance_type | desc: "AWS instance type" | default: "p3.2xlarge" }}"
  //Attach a key_pair to control login access
  key_name = "{{ __name }}"

  ami = data.aws_ami.{{ __name }}.id

  //Attach a security group resource (created below) to control what IP address can ingress into the EC2 instance
  vpc_security_group_ids = [aws_security_group.restrict_traffic.id]

  //Allow users to create multiple attached EBS blocks
  {{# ebs_block_devices | desc: "EBS block devices to attach to instance" }}
  ebs_block_device {
    device_name = "{{ ebs_block_devices.name | desc: "Block device name" | default: "llm-storage" }}"
    volume_type = "{{ ebs_block_devices.type | desc: "Storage type (SSD or HDD). Recommend using io2" | default: "io2" }}"
    volume_size = {{ ebs_block_devices.volume_size | desc: "How big should the attached volume be in GB?" }}
  }
  {{/ ebs_block_devices }}

  metadata_options {
    //Allows for the metadata service to be available, but requires session tokens
    http_endpoint = "enabled"
    http_tokens = "required"
  }
}

//the aws_key_pair resource used for SSHing into the EC2 instance
resource "aws_key_pair" "{{ __name }}" {
  key_name = "{{ __name }}"
  public_key = "{{ public_key | desc: "Public key string as listed in your pub key file. You can find your public key string here: https://docs.aws.amazon.com/AWSEC2/latest/UserGuide/describe-keys.html#describe-public-key" }}"
}


//Create a security group resource that only allows inbound traffic from a defined IP address
resource "aws_security_group" "restrict_traffic" {
  name        = "restrict-traffic"
  description = "Allow traffic from specific CIDRs"

  ingress {
    description = "Allow SSH from specific CIDRs (single IP addresses)"
    from_port   = 22
    to_port     = 22
    protocol    = "tcp"
    cidr_blocks = {{ ingress_ip_addresses | desc: "The IP addresses you want to access the EC2 instance from. Must be in format 0.0.0.0/32" }}
  }

  egress {
    description = "Allow all outbound traffic"
    from_port   = 0
    to_port     = 0
    protocol    = "-1"
    cidr_blocks = ["0.0.0.0/0"]
  }
}
Let’s walk through how Rick built the Blueprint that generated this form and ultimately the Terraform above. First, we start by defining constants and variables. This gives us a constant, __name, that is unique based on user input of a name variable + a unique id.
---
constants:
  __name: "{{ name }}_{{ __guid }}"
variables:
  name:
    desc: "Name of the resource. We recommend using the date and model name, as in MMDDYYYY-Model_Name."
    default: "MMDDYYYY-Model_Name"
---
We also define AMI data in our blueprint:
data "aws_ami" "{{ __name }}" {
  most_recent = true

//sets VM to an Ubuntu OS
  filter {
    name   = "name"
    values = ["ubuntu/images/hvm-ssd/ubuntu-focal-20.04-amd64-server-*"]
  }

//Uses a hardware virtual machine (hvm)
  filter {
    name   = "virtualization-type"
    values = ["hvm"]
  }

//limits to Hammock, Inc's AWS account ID
  owners = ["453765437354"]
}
You’ll notice that both the VM name and virtualization type are hard-coded. This is purposeful: Rick didn’t want to allow developers to choose anything other than Ubuntu, or a hardware virtual machine (hvm).
Let’s look at the biggest part of our blueprint, the aws_instance resource.
//the actual aws_instance resource
resource "aws_instance" "{{ __name }}" {
  //Allows the user to choose an instance type. We restrict the types to starting with p and g with Guardrails
  instance_type = "{{ instance_type | desc: "AWS instance type" | default: "p3.2xlarge" }}"
  //Attach a key_pair to control login access
  key_name = "{{ __name }}"

  ami = data.aws_ami.{{ __name }}.id

  //Attach a security group resource (created below) to control what IP address can ingress into the EC2 instance
  vpc_security_group_ids = [aws_security_group.restrict_traffic.id]

  //Allow users to create multiple attached EBS blocks
  {{# ebs_block_devices | desc: "EBS block devices to attach to instance" }}
  ebs_block_device {
    device_name = "{{ ebs_block_devices.name | desc: "Block device name" | default: "llm-storage" }}"
    volume_type = "{{ ebs_block_devices.type | desc: "Storage type (SSD or HDD). Recommend using io2" | default: "io2" }}"
    volume_size = {{ ebs_block_devices.volume_size | desc: "How big should the attached volume be in GB?" }}
  }
  {{/ ebs_block_devices }}

  metadata_options {
    //Allows for the metadata service to be available, but requires session tokens
    http_endpoint = "enabled"
    http_tokens = "required"
  }
}
Here we create the aws_instance resource and append our unique __name constant as the name. We then set the instance_type parameter as equal to {{ instance_type }} along with some description and default tags.
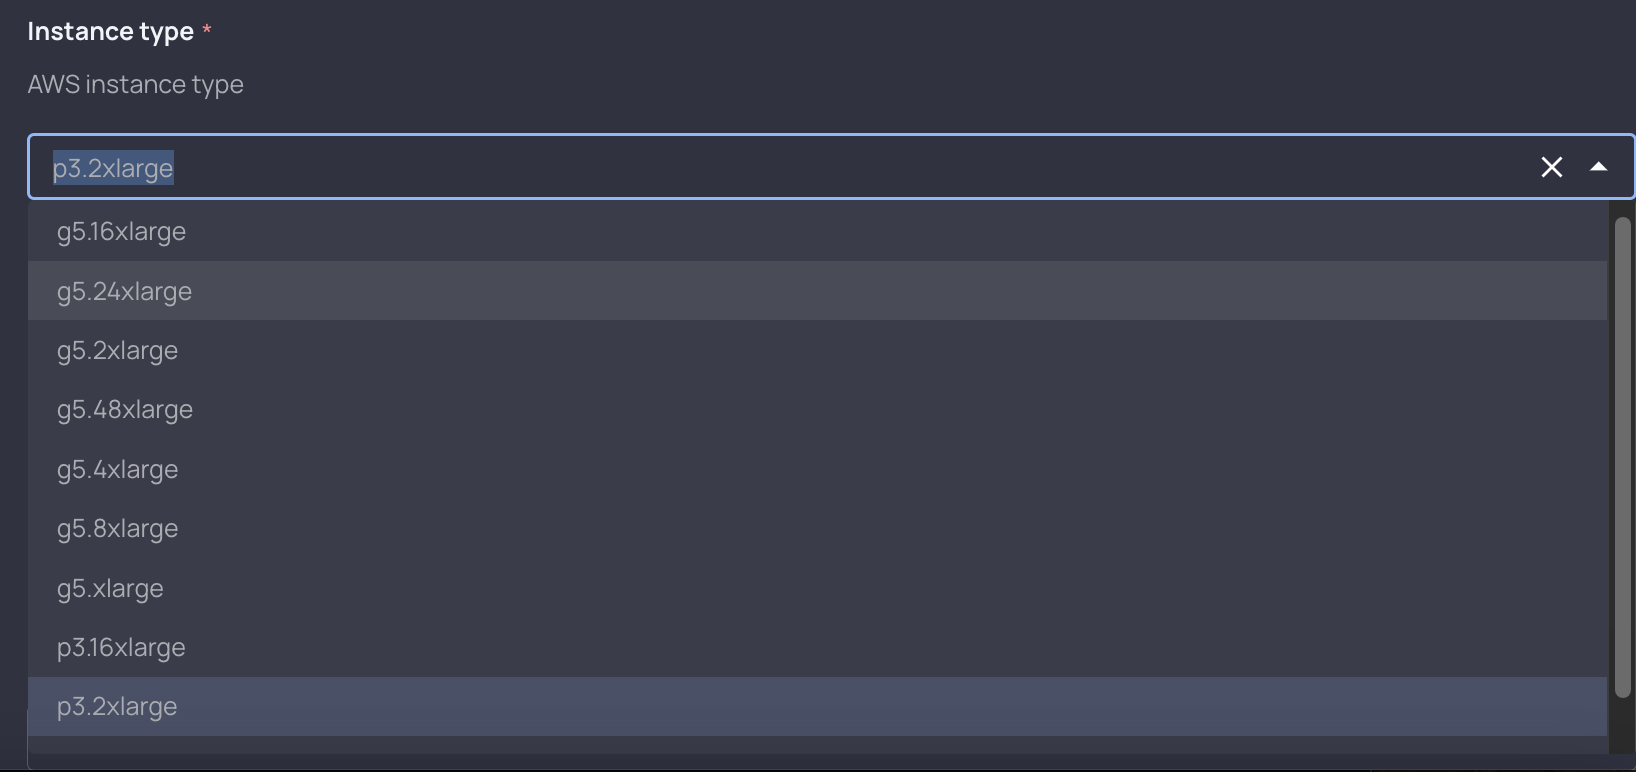
//Allows the user to choose an instance type. We restrict the types to starting with p and g with Guardrails
  instance_type = "{{ instance_type | desc: "AWS instance type" | default: "p3.2xlarge" }}"
Since we set a parameter as equal to a variable using the curly brackets, Resourcely automatically:
- creates a field in our form for instance type, that is a picklist with all available options from the
instance_typefield- Note that we are limiting the available options in this field with Guardrails. These are policies that can be attached to Blueprints, which prevent users from unwanted actions. In this case, Hammock wanted to only use
pandgtype EC2 instances, so they were limited from this Blueprint via Guardrails.
- Note that we are limiting the available options in this field with Guardrails. These are policies that can be attached to Blueprints, which prevent users from unwanted actions. In this case, Hammock wanted to only use
- Adds a custom description
- Defaults to our
instance_typeof choice
Here’s what that form looks like to an end user:
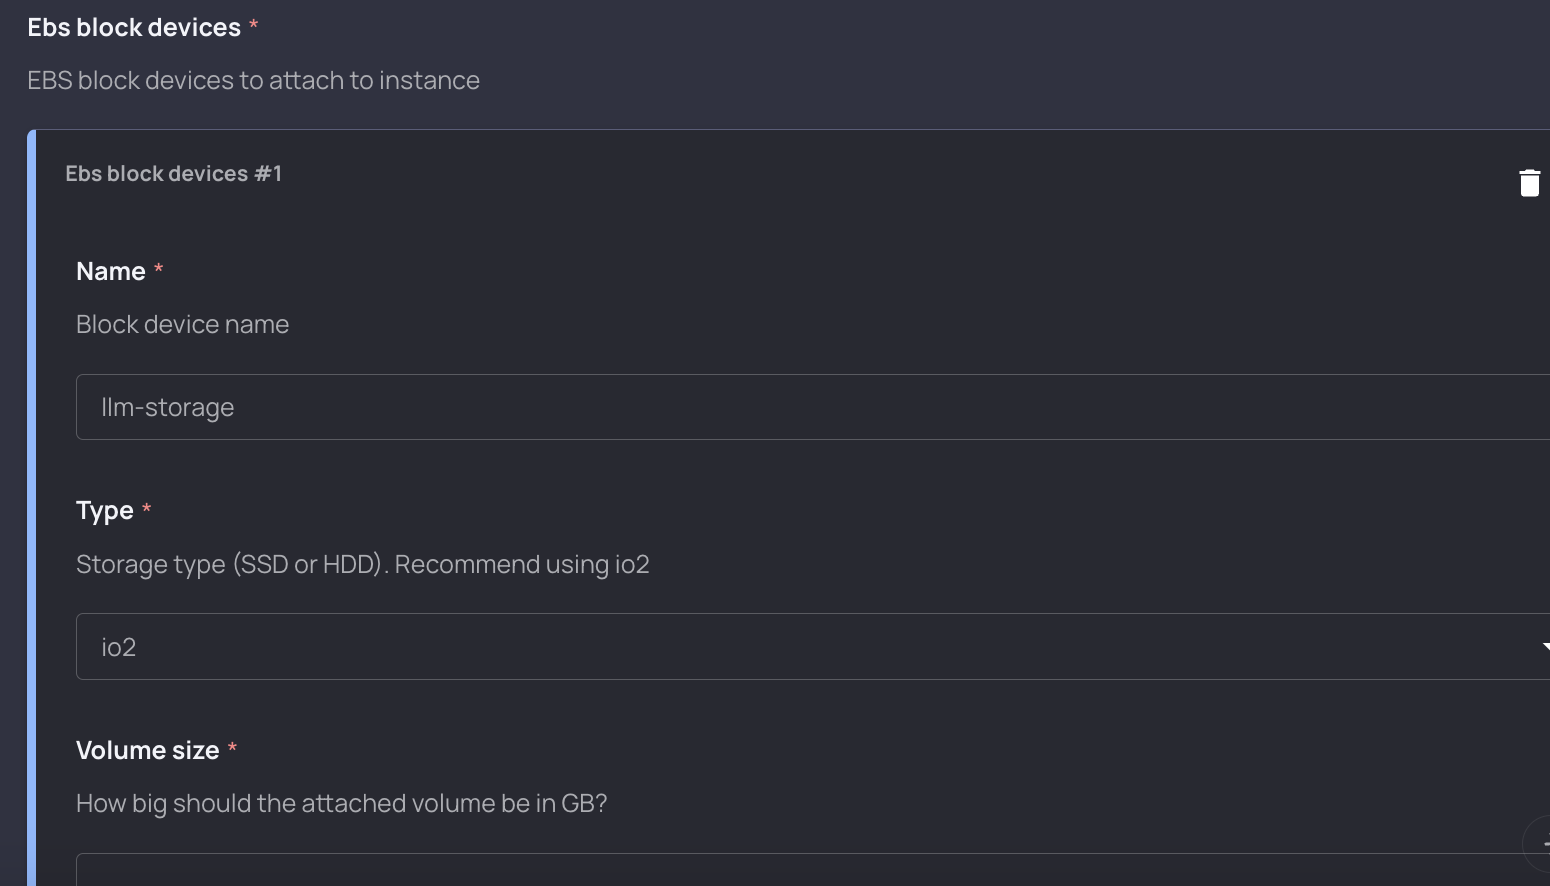
We then link some of our resources together (with the ami_id and security_group_ids), before getting into a unique type of input in Resourcely: section blocks.
//Allow users to create multiple attached EBS blocks
  {{# ebs_block_devices | desc: "EBS block devices to attach to instance" }}
  ebs_block_device {
    device_name = "{{ ebs_block_devices.name | desc: "Block device name" | default: "llm-storage" }}"
    volume_type = "{{ ebs_block_devices.type | desc: "Storage type (SSD or HDD). Recommend using io2" | default: "io2" }}"
    volume_size = {{ ebs_block_devices.volume_size | desc: "How big should the attached volume be in GB?" }}
  }
  {{/ ebs_block_devices }}
The {{# variable }} {{/ variable }} syntax allows us to create a group of input, and to accept multiples of that group of inputs. Since the AI team wanted to be able to specify the amount an type of storage, we are also giving them the ability to attach multiple EBS blocks to their EC2 instance.
Here’s what the above look like to an end user:
We have two other primary areas where we take input in our Blueprint. First, we create an aws_key_pair, and ask for user input for their public key string to create it (with the {{ public_key }} where we have also included a helpful link if the user needs it).
Note that this is one of the resources we linked to the aws_instance resource earlier.
//the aws_key_pair resource used for SSHing into the EC2 instance
resource "aws_key_pair" "{{ __name }}" {
  key_name = "{{ __name }}"
  public_key = "{{ public_key | desc: "Public key string as listed in your pub key file. You can find your public key string here: https://docs.aws.amazon.com/AWSEC2/latest/UserGuide/describe-keys.html#describe-public-key" }}"
}
Finally, we create a security group resource for restricting traffic to the VM. We know that the AI team wanted to minimize networking configuration involvement (who wouldn’t!), so we only ask them to provide the IP address that they’re going to access the VM from.
This configuration will protect our VM (and the team using it), while allowing them to access it. You’ll notice the {{ ingress_ip_addresses }} variable, which is our last piece of user input. We help the user with a description that indicates what type of input we are looking for.
//Create a security group resource that only allows inbound traffic from a defined IP address
resource "aws_security_group" "restrict_traffic" {
  name        = "restrict-traffic"
  description = "Allow traffic from specific CIDRs"

  ingress {
    description = "Allow SSH from specific CIDRs (single IP addresses)"
    from_port   = 22
    to_port     = 22
    protocol    = "tcp"
    cidr_blocks = {{ ingress_ip_addresses | desc: "The IP addresses you want to access the EC2 instance from. Must be in format 0.0.0.0/32" }}
  }

  egress {
    description = "Allow all outbound traffic"
    from_port   = 0
    to_port     = 0
    protocol    = "-1"
    cidr_blocks = ["0.0.0.0/0"]
  }
}
Conclusion: Resourcely Blueprints help streamline infrastructure deployment
The Hammock AI team had a problem: they didn’t want to spend time configuring infrastructure. Luckily, Rick from Hammock’s platform team knew of a way to help them: Resourcely Blueprints.
We saw how opinionated Terraform that includes best practices can be generated without requiring a developer team to even know Terraform. We also saw how Resourcely automatically generates a form that takes developer inputs while hardwiring other inputs that you might not want a developer to change.
Paving a road to production for your developers can be hard if you go it alone. You can try out the very Blueprint that we created, by signing up for Resourcely today.


